Desert Night Sky Photo Tours Basics With Camera Settings, Weather, and Stargazing Tips
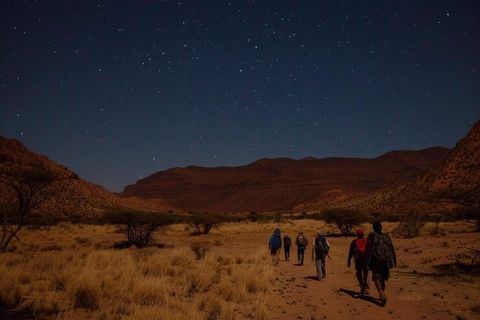
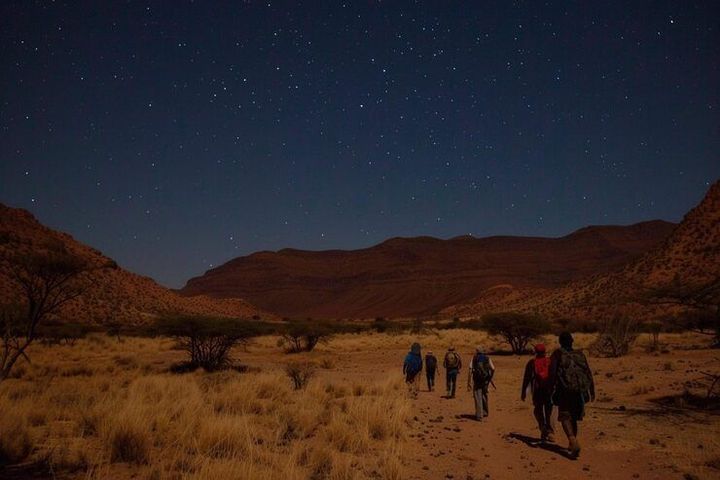
Desert night sky photo tours combine landscape photography, astronomy, outdoor travel, and guided stargazing. They usually take place in areas with limited artificial light, where the Milky Way, stars, planets, constellations, and other night-sky features can be photographed more clearly.
A desert environment can also provide distinctive foreground elements such as dunes, rock formations, dry valleys, and distant mountains.
The idea of photographing the night sky developed alongside improvements in cameras, lenses, film, and later digital sensors. Modern cameras can capture relatively faint sources of light when they are paired with suitable lenses, stable support, and carefully selected exposure settings.
A desert night sky photo tour may involve travel to a dark location before sunset, landscape composition during twilight, stargazing after darkness, and photography throughout the night. Some tours focus mainly on learning camera techniques, while others combine photography with astronomy education and outdoor exploration.
Weather and moon conditions play an important role. Clouds can obscure stars, strong winds can shake camera equipment, and dust can reduce visibility. The phase and position of the Moon also affect how dark the sky appears and how much detail can be recorded.
What a Night Sky Photo Tour Involves
A typical experience can include several stages:
Travel to a designated dark-sky location
Sunset and landscape photography
Equipment preparation before darkness
Stargazing and constellation identification
Night-sky composition
Long-exposure photography
Review of images and camera settings
Return travel after the photography session
The exact schedule depends on the location, season, moon phase, weather, access restrictions, and tour structure.
Desert Conditions and Night Photography
Deserts can provide dark environments far from major sources of artificial light. However, darkness alone does not guarantee clear photographic conditions. Atmospheric dust, humidity, haze, clouds, and wind can all influence visibility.
Temperatures can also change significantly between daytime and nighttime. Camera batteries may perform differently in cold conditions, while condensation can become a concern when equipment moves between different temperatures.
Importance
Desert night sky photography matters to both recreational photographers and people interested in astronomy. It provides an opportunity to learn how exposure, focus, composition, weather, and astronomical conditions interact.
The subject also has a broader connection with responsible tourism. Many dark-sky locations are environmentally sensitive areas where visitors need to follow access rules, protect natural surroundings, and avoid disturbing wildlife.
Who Participates in Night Sky Photo Tours?
Participants can range from beginners using basic interchangeable-lens cameras to experienced photographers working with specialized equipment. A smartphone may also be useful for identifying constellations, checking moon phases, or recording basic night-sky scenes.
A participant does not necessarily need extensive astronomy knowledge. Understanding a few basic concepts can make the experience easier:
Earth rotates, causing stars to appear to move across the sky.
The Moon changes position and phase throughout its cycle.
Different constellations are visible at different times of year.
Artificial light can reduce the visibility of faint stars.
Clouds, dust, and atmospheric moisture can affect visibility.
Camera Equipment
A night photography setup does not need to be complicated, but stability and light-gathering ability are important. A camera with manual exposure controls provides greater control over shutter speed, aperture, and ISO.
A sturdy tripod helps prevent movement during long exposures. A wide-angle lens with a relatively wide aperture is commonly used for Milky Way landscapes because it can capture a large portion of the sky while allowing substantial light to reach the sensor.
Other useful equipment can include:
Spare batteries
Memory cards
Headlamp with a red-light mode
Lens cloth
Remote shutter release
Lens hood
Protective camera bag
Warm clothing
Water and outdoor essentials
Recent Updates
From 2024 through 2026, night-sky photography has continued to benefit from improvements in digital camera sensors, computational photography, smartphone astronomy applications, image-processing software, and portable equipment.
Camera Settings and Low-Light Technology
Modern cameras can provide improved performance at higher ISO settings, while software can reduce digital noise and improve shadow detail. However, the appropriate settings still depend on the camera, lens, sky brightness, and desired image style.
For a basic Milky Way landscape, photographers often begin with manual focus, a wide aperture, a relatively short exposure, and a moderate-to-high ISO. These are starting points rather than universal settings.
A simple reference table can illustrate common starting ranges:
| Photography Goal | Shutter Speed | Aperture | ISO |
|---|---|---|---|
| Milky Way landscape | 10–25 seconds | Wide aperture | 1600–6400 |
| Star trails | Several minutes or multiple exposures | f/2.8–f/5.6 | 400–1600 |
| Moon landscape | 1/30–2 seconds | f/4–f/8 | 100–800 |
| Twilight landscape | 1–10 seconds | f/4–f/8 | 100–800 |
These figures are general starting ranges. Bright moonlight, camera sensitivity, lens aperture, and artificial light can require substantial adjustments.
Focus at Night
Autofocus can struggle in very dark conditions. Manual focus is therefore commonly used for stars. One approach is to use live view, magnify a bright star or distant light, and carefully adjust the focus until the point of light appears as small and precise as possible.
Focus should be checked after changing lenses or moving equipment. Small adjustments can make a noticeable difference in photographs containing many distant stars.
Smartphone Astronomy Tools
Astronomy applications have become widely used for identifying constellations, planets, the Milky Way, moon phases, and celestial events. Many applications use the phone's location and orientation sensors to display an approximate view of the sky.
Photographers can use these tools during planning to determine where the Milky Way or other objects are expected to appear. This can help with composition before darkness arrives.
Computational Photography
Image-stacking and noise-reduction techniques have also become common in night photography. Multiple exposures can sometimes be combined to improve detail or reduce random noise.
Star-trail photography may use a sequence of shorter exposures rather than one extremely long exposure. This approach can provide greater control during processing and can reduce certain problems associated with very long exposures.
Laws or Policies
Desert night sky photo tours are affected by land-access rules, protected-area regulations, photography restrictions, environmental policies, traffic requirements, and general outdoor safety laws. The specific requirements vary by country and by the authority responsible for the land.
Protected Areas and Dark-Sky Locations
Some deserts are national parks, nature reserves, conservation areas, archaeological zones, or privately managed properties. Entry may require a permit, reservation, designated route, or authorization for organized activities.
Photography itself may be permitted while commercial or organized activities may have additional requirements. Visitors should follow the rules established for the specific location.
Light and Environmental Protection
Dark-sky areas may have guidelines intended to limit unnecessary artificial light. Visitors can support these principles by using low-intensity lighting and avoiding unnecessary illumination toward wildlife, other visitors, or the sky.
Environmental protection is also important. Desert ecosystems can be sensitive to vehicle traffic, litter, vegetation disturbance, and unauthorized camping. Visitors should remain on designated routes where required and follow local waste-management rules.
Outdoor Safety
Desert environments can involve uneven terrain, extreme temperature changes, limited mobile coverage, and long distances between facilities. Night photography adds another consideration because reduced visibility can make navigation more difficult.
Tour participants should follow designated access routes and local safety instructions. Weather changes should also be taken seriously, particularly when strong winds, storms, flooding, or extreme temperatures are possible.
Tools and Resources
Planning desert night sky photography can involve several digital and physical resources. Weather applications can provide forecasts for cloud cover, wind, humidity, temperature, and visibility. These factors can help photographers understand whether conditions may support a particular type of photography.
Astronomy applications can show moon phases, planetary positions, constellation locations, and the expected position of the Milky Way. Light-pollution maps can help identify areas with relatively dark skies.
Useful planning resources include:
Astronomy sky maps
Moon-phase calendars
Weather forecasting applications
Light-pollution maps
Camera exposure calculators
Star-trail planning tools
Digital maps
GPS navigation applications
Trip-planning checklists
Camera manuals
Image-processing software
Battery and storage checklists
A camera exposure calculator can help estimate shutter speed for particular night photography conditions. However, calculations should be treated as starting points because different cameras and lenses respond differently to low light.
Basic Planning Checklist
Before a desert night sky photo tour, photographers can review several practical factors:
Moon phase and moon position
Cloud forecast
Wind conditions
Temperature range
Location access
Expected artificial-light levels
Camera battery capacity
Available storage
Lens and tripod condition
Clothing and outdoor equipment
Navigation arrangements
Planning also includes determining the intended composition. A foreground object such as a dune, rock formation, tree, or mountain can give a star-filled photograph a sense of scale and depth.
FAQs
What camera settings are used for desert night sky photography?
A common starting point is a wide aperture, a shutter speed around 10–25 seconds, and an ISO between 1600 and 6400 for Milky Way landscapes. The exact settings depend on the camera, lens, moonlight, and surrounding light.
What weather is suitable for desert night sky photo tours?
Clear or mostly clear skies are generally more suitable for stargazing and astrophotography. Low cloud cover, limited haze, manageable wind, and low atmospheric moisture can improve visibility, although local desert conditions vary.
Do I need a tripod for desert night sky photography?
A tripod is highly useful because night-sky photography often uses relatively long exposures. A stable tripod helps prevent camera movement and can make it easier to maintain a carefully planned composition.
What are important stargazing tips for desert photography?
Check the moon phase, identify the Milky Way position, review cloud and wind forecasts, arrive before darkness, use a stable tripod, focus manually on distant points, and carry suitable lighting and navigation equipment.
Can beginners join desert night sky photo tours?
Many photography tours include introductory explanations of camera settings, focusing, composition, and basic astronomy. Participants should check the physical requirements, equipment expectations, schedule, and location conditions before participating.
Conclusion
Desert night sky photo tours combine photography, astronomy, outdoor travel, and landscape exploration in dark environments. Camera settings, stable support, accurate focus, moon conditions, weather, and light pollution all influence the resulting images. Modern cameras, astronomy applications, digital maps, and image-processing tools have expanded the techniques available to photographers. Responsible participation also requires attention to land-access rules, environmental protection, outdoor safety, and local regulations.